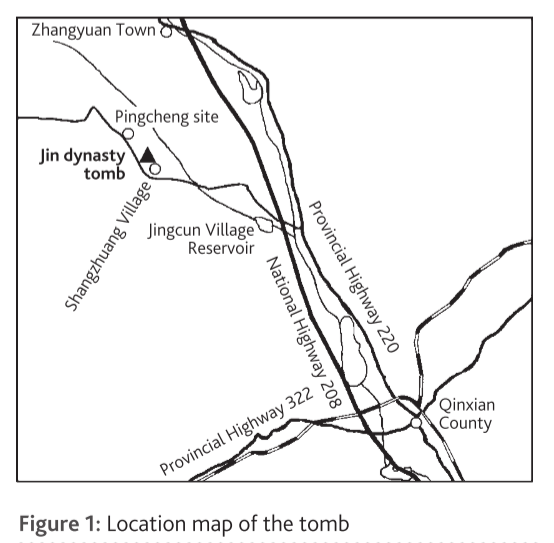
Jointly with Qinxian County Museum of Cultural Relics, Shanxi Provincial Institute of Archaeology conducted a rescue excavation of a brick chamber tomb (numbered Tomb M1) at Shangzhuang Village, Zhangyuan Town, Qinxian County, Shanxi Province, in June 2015 (Figure 1). The tomb is located on a hillside that is higher in the west and lower in the east. At the time of excavation, the northwest corner of the tomb top has been destroyed. The brick carvings on the walls of the tomb are well preserved. Below is a brief report of the excavation.
BURIAL STYLE
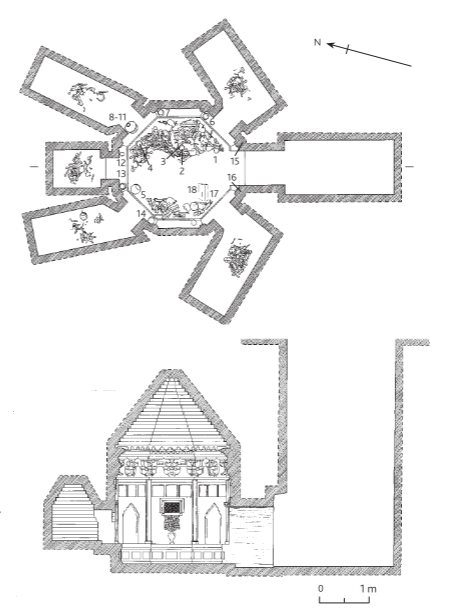
This tomb is a brick tomb simulating a wooden structure, oriented at 173 degrees, consisting of the tomb entrance corridor, tomb entrance, passage, tomb chamber, and side chambers (Figure 2). The entire tomb is built with bricks; the long bricks measure 36 centimeters long, 16 cm wide, and 8 cm thick and the square bricks measure 33 cm long on each side and are 5 cm thick.
The ramp is located to the south of the passage. It has a rectangular plan view, a flat bottom, and a smooth inclined wall. Since the south end of the ramp directly leads to a cliff, it is only partly excavated, and the unearthed area measures 2.5 meters long and 1.2 m wide. The filling dirt is loose grayish-brown tessellated soil with relatively large particles, containing a large amount of plant roots and a small amount of bricks, stones, and tiles.
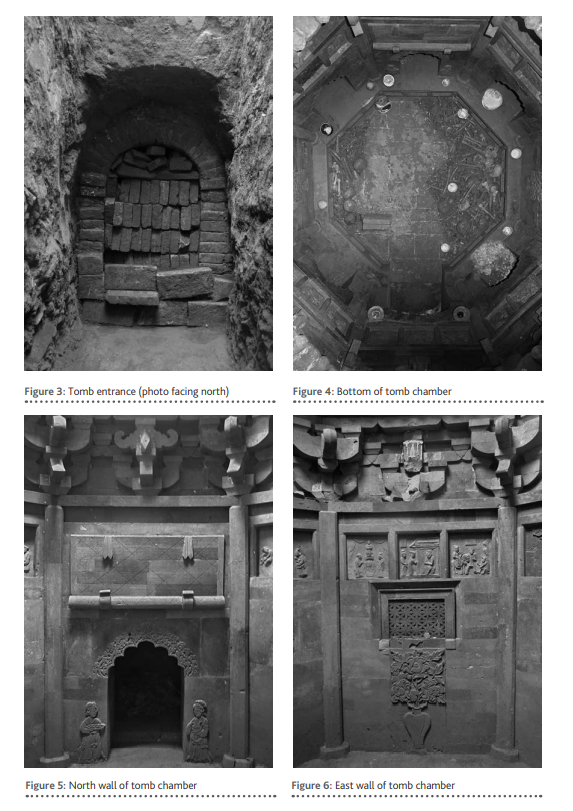
The tomb entrance is located at the northern end of the entrance corridor. The major structure is an arch, 1.08 m wide and 1.48 m high, built with long bricks, The entrance is sealed with six courses of long bricks. From bottom to top there are two courses of shiners, four courses of rowlocks, two sandstone blocks side by side in stretcher position, and the rest of the space is filled with half bricks (Figure 3).
The passage is located to the south of the tomb chamber. It is rectangular in plan view, 1.08 m long, 0.7 m wide, and 1.2 m high. The wall of the passage is built with horizontal long bricks. It has a vaulted ceiling.
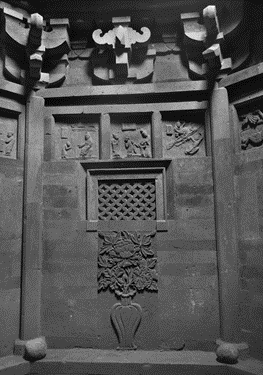
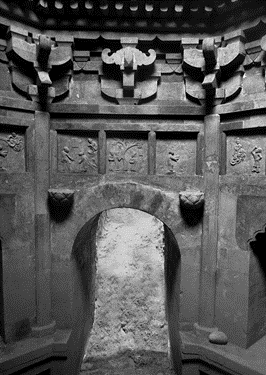
The tomb chamber is located to the north of the passage. It is octagonal in plan view, and is 2.6 m wide, 2.5 m deep, and 4 m high. The bottom part of the walls is built in the form of a 0.42 m-high sumeru base that continues to the bottom part of the passage. The tomb chamber floor is paved with square and long bricks in a stretcher pattern (Figure 4). All the walls are made of carved bricks simulating a wooden structure. At each corner of the octagonal chamber there is a 1.32 m high pilaster, each with a square plinth. On top of pilasters are pupaifang-architraves. The column-top bracket set [which can also be considered as the corner puzuo-bracket set in this case] has four tiers with one cha’ang-inserted beak head. Also, on each wall there is one intercolumnar bracket set. On top of the dougong-bracket sets there is a layer of dianban-cushion boards, followed by yanchuan-eave rafters, roof tiles, and dishui-drip tiles. The top part of the chamber is built with 21 courses of long bricks in the way that each course slightly projects above its lower course. Finally, it is sealed on top with an entire block made up of three long bricks wrapped in lime plaster. At each of the north, northeast, southeast, southwest, and northwest sides, there is one side chamber extending outwards. On the upper part of the north wall of the tomb chamber, there is a brick-carved rolled-up curtain between two pilasters. Below the curtain, in the middle, there is an entrance to the side chamber. The doorway has an arched lintel in the shape of a ruyi-scepter scroll, decorated with connecting arcs and honeysuckle patterns. A female servant is carved on each side of the door. The one on the west side holds a tray with both hands, and there are two zhan-tea bowls on the tray. The one on the east side holds a teapot’s handle with her right hand and supports the bottom of the teapot with her left hand (Figure 5). The north side chamber has a rectangular plan view and a corbelled ceiling. It is 1 m long, 0.75 m wide, and 1.2 m high, housing a set of human skeletal remains. On the other seven walls, long bricks are used to build the frames for brick-carved scenes of filial piety stories. Each wall features a group of three scenes, so there are 21 scenes in total. On the east and west walls, below the filial piety scenes there is a carved fake window in the middle, below which is carved a vase with flowers in it. To specify, on the east wall, the lattice pattern on the fake window is a combination of square and diamond grids of slim long leaves, each incised with four lines, and the flowers in the vase are peonies (Figure 6); on the west wall, the lattice pattern on the fake window is a diamond grid of wide rounded leaves, each incised with four lines, and the flowers in the vase are chrysanthemums (Figure 7). On the south wall, below the filial piety scenes there is one stone lamp holder each on the east and west sides. Each stone lamp holder is decorated with three layers of carved lotus petals, and a porcelain zhan-cup is placed on each holder. Below these lamp holders is the doorway to the passage (Figure 8). Below the filial piety scenes on the other four walls, each has an entrance to a side chamber. Each side chamber has a doorway featuring an arched lintel in the shape of a ruyi-scepter scroll, decorated with connecting arcs. These side chambers also have a similar size, 1.8 m to 2.05 m long, 0.75 m to 0.85 m wide, and 1.1 m high, with a rectangular or approximately rectangular plan view, and a vaulted ceiling. Each side chamber contains a set of poorly preserved human skeletal remains that are loosely scattered in powder form. In the main tomb chamber, a total of 13 sets of human skeletal remains are recovered. They were divided into two piles and placed in disorder: one pile of four skulls and some limb bones is placed at the west side; the other pile at the east side contains seven complete skulls, two incomplete skulls, and a lot of other parts of human bones.
BRICK-CARVED SCENES OF FILIAL PIETY STORIES
All seven walls of the tomb chamber, except the north wall, contain a group of three brick-carved scenes of filial piety stories, and each scene has a side length of 0.25 m. The brick carvings are molded and plain with no color paint. Some of them bear inscriptions but the characters are mostly worn and illegible. According to the inscriptions and contents of these brick carvings, and by comparing them with the filial piety scenes discovered in the Song and Jin tombs in the southeastern area of Shanxi province, the brick-carved scenes of filial piety stories in this tomb are described below.
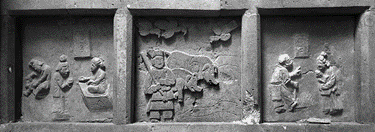
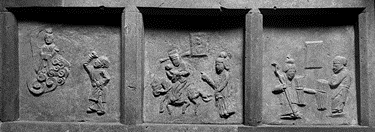
Northeast wall: The first scene from the left depicts the wife of Wang Wuzi offering her flesh to her sick mother-in-law by cutting her thigh. Three figures are carved on the brick. On the right side, an old woman sits on a couch, stretching out her right hand. In the middle, a woman is standing and bows with hands clasped in front of her chest, facing the old woman. On the left side, a man sits on the ground with his back against the middle woman and his head bent down. An inscription of “Wang Wuzi” [王武子] is engraved on the upper right part of the brick. The second scene depicts Shun, whose filial piety moved the mind of heaven. On the brick is carved one figure, two elephants, and three birds. The three birds are on the top part of the scene, the two on the left facing right and the one on the right facing left. In the middle there are two elephants with long trunks, big ears, and big eyes, facing right and bending down to plow the field, where seedlings of rice crops can be seen. On the lower left there is a man standing in the field, wearing a hat and holding a long stick. The third scene depicts Guo Ju burying his son [for his mother]. Three figures are carved on the brick. On the left is a man wearing a folded hat. Facing right, he raises his left hand, pointing upwards, carries a shovel in his right hand, and lifts his right toes, as if he is digging the ground. On the right is a woman holding a baby in her arms, facing the man. The inscription is illegible (Figure 9).
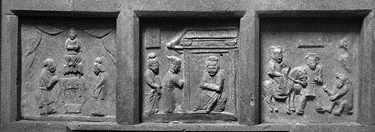
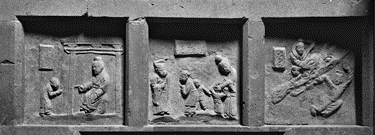
East wall: The first scene from the left depicts Ding Lan, who carved wooden figurines of his parents to serve them. Three figures are carved on the brick. In the upper middle is an old woman sitting on a couch; below is a table on which there seems to be some offerings. On the left is a man wearing a folded hat, bending to bow. On the right side is a woman with hands hanging on the front. The second scene depicts Jiang Shi practicing filial piety. Three figures, two on the left and one on the right, are carved on the brick. On the left is a woman with both hands held together in front of her abdomen. On her right side, a man with his back slightly bent is bowing with both hands folded in front of his chest. Both figures are facing the old woman on the right side. The old woman sits inside a house with her hands resting inside the sleeves on her lap. The inscription has two characters: “Jiang Shi” [姜诗]. The third scene depicts Tanzi, who fed his parents with doe’s milk. Three figures are carved on the brick. On the left is an official on horseback, wearing an official hat. The middle one is wearing an official hat, his right hand seemingly leading the horse. The figure on the right is sitting on the ground, dressed in a deer’s skin and head. The inscription has two characters: “[…]zi” [子] (Figure 10).
Southeast wall: The first scene depicts Cao E, who cried along the riverbank in search of her drowned father’s body. The brick is carved with a figure who is dressed in mourning apparel, standing by the river. The second scene depicts Yigu of Lu [lit. “the Righteous Young Mother of the Duchy of Lu”] abandoning her own child to save her nephew. Five figures are carved on the brick. On the left is a woman holding a child in her arms; in front of her feet, another child is lying on his front legs and knees, with his hands clutching the woman’s clothes. The middle figure holds a long stick as if he is about to beat the woman. The figure on the right side seems to be an official, wearing an official hat and riding on horseback; his left hand holds the reins of the horse, and his right hand reaches out towards the man with the stick. The third scene depicts Liu Yin who practiced filial piety. Two figures are carved on the brick. On the lower left is a man with outstretched hands who looks up toward the upper right, where a figure standing on clouds is facing down on him. The inscription has two characters: “[…] Yin” [殷] (Figure 11).

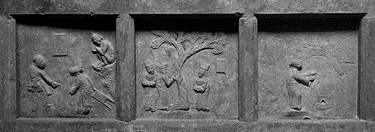
South wall: The first scene from the left depicts [Sun] Yuanjue persuading his father not to abandon his grandfather. There are three figures on the brick. On the right side is a naked old man sitting on top of a rock hill. The man on the lower left is facing and pointing at the boy in the middle with his right hand. The boy carries in his right hand an object that looks like a fence [which should be a bamboo stretcher, according to the original story – Trans.]. The inscription has two characters: “Yuanjue” [元觉]. The second scene depicts the Tian Zhen brothers crying at the redbud tree. Three figures are carved on the brick. They wear identical clothes and stand around a tree. Among them, the two figures on the left and right place both hands in their sleeves near their abdomens, and the middle figure supports the tree with his right hand. The inscription is illegible. The third scene depicts Cai Shun picking mulberries for his mother. One figure is carved on the brick. A tree is carved on the upper right. A figure on the lower left looks up at the tree with both arms open and slightly raised. A basket is placed under the tree (Figure 12).
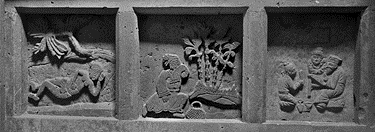
Southwest wall: The first scene from the left depicts Dong Yong selling himself as a slave to pay for his father’s funeral. Two figures are carved on the brick. On the left is a woman in fine dress standing above the clouds. On the right side is a man, his right hand raised, his left hand placed on the abdomen, looking up at the woman on the left. The second scene depicts Liu Mingda selling his son to support his mother. There are three figures on the brick. On the left is a man wearing an official hat; he is riding on a horse with a baby in his arms as if he is about to gallop away. On the right side is a woman following the horse, pointing at the man. The inscription is illegible. The third scene depicts Zeng Shen who would feel pain in his heart when his mother bit her finger. Two figures are carved on the brick. On the left is an old woman holding a walking stick in her right hand, facing the man on the right. On the right side, the man is facing the old woman with his hands in front of his chest. The inscription has two characters: “Zeng Shen” [曾参] (Figure 13).
West wall: The first scene from the left depicts Lu Ji as a little boy hiding mandarin oranges to take home for his mother. Two figures are carved on the brick. On the right side is a woman sitting in the house, facing the child on the left, and pointing her right index finger at the child. The child is facing the woman, bowing and holding a small object with respect. The inscription has two characters: “Lu Ji” [陆绩]. The second scene depicts Min Sun who obeyed his stepmother and wore a thin coat lined with dried reeds. Five figures are carved on the brick. On the right is a woman who bows down to comfort a child next to her. On the left is a man with his right arm bent in a questioning pose. There are two children in the middle. The child on the left side is older; he bends his arms with hands in front of his chest and his back is bent, facing the man on the left to beg for his mercy. A younger boy is behind him. The inscription is illegible. The third scene depicts Yang Xiang fighting a tiger to save her father. Two figures are carved on the brick. At the bottom right is a man who is terrified, his body slanted and his hands held high. Above is a woman wearing a draping ribbon [pibo], riding on an animal which seems to be a tiger. The woman and the animal are both looking at the man. The inscription reads “Yang Xiang the daughter” [杨香女] (Figure 14).
Northwest wall: The first scene depicts Wang Xiang laying on ice in search of carps. One figure is carved on the brick. The naked man is lying on his back, and a carp is under his body. Trees are carved on the upper left. The second scene shows when Meng Zong cried and the bamboo sprouted. One figure is carved on the brick. The figure is on the left side, his right hand placed on his leg, his left hand raised, covering his face and sobbing. A basket is placed in front of him on the ground. On the right side are four bamboo stalks. The third scene depicts Master Lao Lai [Lao Laizi] dressing up to amuse his parents. There are three figures on the brick. On the left is a man kneeling on the ground, facing the right side, holding a short stick in his hand. A pot and a bowl are placed in front of his knees. Two elders are carved on the right side, looking at the man on the left. The old woman is lying on her stomach on the table. The old man wearing a hat is sitting on the bench and touching his beard. The inscription has three characters: “Lao Laizi” [老来子, lit. “the son who is born when parents are aged”] (Figure 15).
ARTIFACTS UNEARTHED
A total of 18 artifacts were unearthed from this tomb, mostly placed on the bottom of the tomb chamber and the sumeru base. Among them, on the bottom of the tomb chamber there are three porcelain bo-bowls, one ceramic guan-jar, one bronze zan-hairpin, and two bricks with a checkered pattern (placed vertically). On the sumeru base there are four ceramic wan-bowls, three porcelain bo-bowls, one porcelain guan-jar, and one porcelain zhan-cup. In addition, one porcelain zhan-cup is placed on each of the two stone lamp holders on the south wall.
Porcelain zhan-cups (3 items): All are molded. M1:15 has a flared mouth, oblique sides, and a flat base, glazed brown on the surface. Its mouth diameter is 7.4 cm, base diameter is 4 cm, and height is 3.2 cm. M1:12 has a flared mouth, oblique sides, and a false ring foot, glazed brown on the surface. There are obvious burning marks on the artifact. Its mouth diameter is 8.2 cm, foot diameter 4.2 cm, and the height is 3 cm.
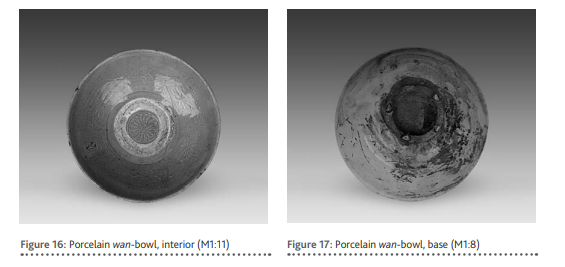
Ceramic wan-bowls (4 items): When unearthed, they were stacked together, all upside down. All are molded in a similar shape and size. Each has a flared mouth, oblique sides, and a ring foot. White glaze is applied to the surface. The inside of M1:11 is decorated with mold-transferred floral patterns, and its inner bottom is incised with a chrysanthemum pattern. Its mouth diameter is 22 cm, foot diameter 6.8 cm, and height 8 cm (Figure 16). On the outer surface of M1:8, an ink inscription that reads “Jing” [景] is found near the ring foot. Nearby on the outer bottom there are two more characters in ink that are illegible. At the rim of the ring foot, a line is drawn in ink outside the four spurs in a circle. The mouth diameter is 22.6 cm, foot diameter 6.5 cm, and height 7.4 cm (Figure 17).
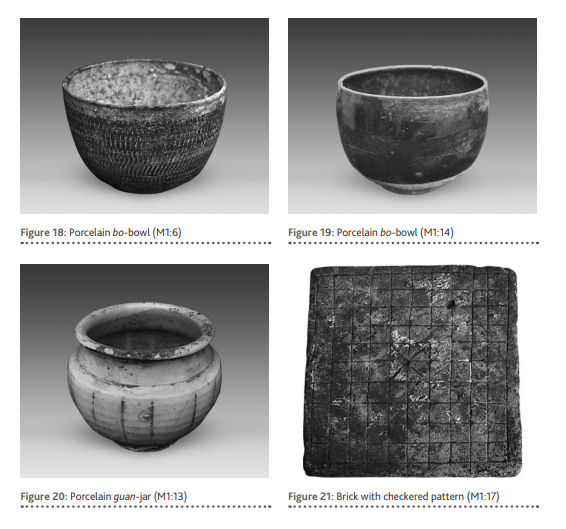
Porcelain bo-bowls (6 items): All are molded, and have a slightly contracted mouth, a relatively straight upper wall and rounded lower wall, and a false ring foot. M1:1 is glazed white on the surface. Two red bowstrings are drawn on the outer surface, one on the upper and the other lower part. In between these two bowstrings are four flowers with green leaves, grouped in pairs, painted in red, yellow and green. The mouth diameter is 11 cm, foot diameter 6 cm, and height 8.5 cm (Figure 22). M1:6 is glazed black on the outer surface below the mouth rim, and is decorated with knife-marked lines [tiao dao wen 跳刀纹]. At the outer bottom there are four characters in ink, but only two of them, “Bei” [北] and “Cai” [才], can be recognized. Its mouth diameter is 11.6 cm, foot diameter 6.2 cm, and height 7.6 cm (Figure 18). M1:14 is glazed in black on the surface except for the bottom part. The mouth diameter is 12.6 cm, foot diameter 7.2 cm, and height 9 cm (Figure 19).
Porcelain guan-jar (1 item: M1:13): It is molded, and has a flared mouth, curled rim, rounded lip, straight neck, bulging belly with 15 melon ridges, and a false ring foot. Its mouth diameter is 10.8 cm, belly diameter 12 cm, foot diameter 6.8 cm, and height 10 cm (Figure 20).
Ceramic guan-jar (1 item: M1:5): It is molded black temperless pottery. It has a contracted mouth, bulging belly, and flat base. Several fine bowstrings decorate the surface. The mouth diameter is 16 cm, belly diameter 20 cm, base diameter 13.2 cm, and height 15.4 cm.
Bronze zan-hairpin (1 item: M1:3): It was placed inside the porcelain bo-bowl (M1:2). It was made by bending a bronze strip, and its outer surface is covered with corrosion, showing a bronze green color. It is 12 cm long and 0.3 cm in diameter.
Bricks with checkered patterns (2 items): They are dark gray. Each is square in plan view with a relatively rough surface. One side is plain. The other side is engraved with 11 horizontal and vertical lines respectively, making up 100 small squares, and each square is 3 cm long; the four small squares in the middle make up a large square, inside of which two lines are carved diagonally to form an X-shape, with a dot is carved at the intersection. M1:17 is 33 cm long and 5 cm thick (Figure 21).
In addition, five slightly polished sandstone blocks in irregular circle or oval shapes are found near the pilaster on the sumeru base in the tomb chamber. One of them is grayish black, one is slightly reddish, and the other three are dark gray.
CONCLUSIONS
Since no dated documents, such as epitaphs, are found in this tomb, its date can only be judged based on the tomb structure, the dress of figures carved on the bricks, and the grave goods. This is a brick-carved tomb simulating a wooden structure. The tomb chamber has an octagonal plan view, and the bottom part of the chamber walls are built in the form of a sumeru base, on which there is a pilaster at each octagonal corner. Brick-carved scenes of filial piety stories are seen along the walls. This kind of tomb structure and decoration method are very similar to those of the brick tomb of the mid Jin dynasty in Nanli Township, Qinxian County, Changzhi City, Shanxi Province, in 1998.[1] In addition, taking other Jin dynasty tombs excavated in southeast Shanxi Province into consideration, such as the Jin dynasty mural tomb in Shizhe Town, Zhangzi County,[2] the Jin dynasty tomb in Anchang Village to the north of Changzhi City,[3] and the Jin dynasty (with dated evidence) color painted brick-carved tomb in Weicun Village, Changzhi City,[4] it can be determined that this tomb should be dated to the middle to late period of the Jin dynasty. Moreover, considering that this tomb is exquisitely constructed and represents fine workmanship, the tomb occupant should be a member of the aristocratic family or a wealthy local.
The discovery of this Jin dynasty tomb at Shangzhuang Village has enriched the excavation data of the brick carved tombs of the Jin dynasty in the southeastern area of Shanxi Province including Qinxian County and Changzhi City. The well preserved brick carved scenes of filial piety stories, to a certain extent, reflect the social customs during the Jin dynasty, and provide new materials for studies of Jin dynasty tombs in the southeastern area and the entire region of Shanxi Province.
________________________________
Field Crew Chief: Qingjie Zhang
Field Crew: Shuzhang Bai, Baojin Ji, Deqiang Wu, and Shaohong Song
Photography: Shuzhang Bai
Drawings: Hongxia Chang, Xiaochuan Yang, and Peng Geng
Prepared by: Shuzhang Bai
__________________________________
References Cited
1. Shang, Tongliu 商彤流, and Hailin Guo 郭海林. 2000. “Shanxi Qinxian faxian Jindai zhuandiao mu” 山西沁县发现金代砖雕墓 (The Jin Dynasty Brick Carved Tomb in Qinxian County, Shanxi Province). Wenwu 文物 (Cultural Relics) No. 6.
2. Cultural Heritage Work Station in the Southeast Shanxi Area of Shanxi Provincial Institute of Archaeology 山西省考古研究所晋东南工作站. 1985. “Shanxi Zhangzi xian Shizhe Jindai bihua mu” 山西长子县石哲金代壁画墓 (The Jin Dynasty Mural Tomb in Shizhe Town, Zhangzi County, Shanxi Province). Wenwu 文物 (Cultural Relics) No. 6.
3. Changzhi Municipal Museum 长治市博物馆. 1990. “Shanxi Changzhi Anchang Jin mu” 山西长治安昌金墓 (The Jin Dynasty Tomb in Anchang Village, Changzhi County, Shanxi Province). Wenwu 文物 (Cultural Relics) No. 5.
4. Changzhi Municipal Museum 长治市博物馆. 2009. “Shanxi Changzhi shi Weicun Jindai jinian caihui zhuandiao mu” 山西长治市魏村金代纪年彩绘砖雕墓 (The Jin Dynasty Color Painted Brick-Carved Tomb (With Dated Evidence) in Weicun Village, Changzhi City, Shanxi Province). Kaogu 考古 (Archaeology) No. 1.
Wenwu (Cultural Relics) Editor: Qian Dai
Translated by Xin Chen, D.Phil., Associate Editor, Chinese Cultural Relics; Independent Scholar, New York City, New York, United States
This article was originally published as “Shanxi Qinxian Shangzhuang Jin mu fajue jianbao” 山西沁县上庄金墓发掘简报 in Wenwu (Cultural Relics) No. 8, 2016, pp. 38-46.