REASONS FOR SURVEY
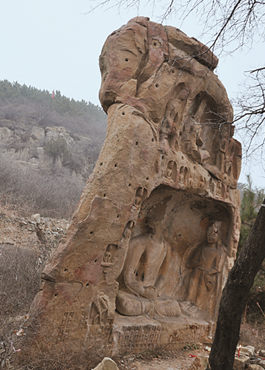
The Dafoshan [lit. “Giant Buddha Mountain”] cliff sculptures are located on the hillside of Dafoshan Mountain, northwest of Zhangbi Village, Mishan Town, Gaoping City, Shanxi Province. The geographic coordinates are 35°49’28.8” N, 113°02’46.69” E, and the site is at an altitude of 1,045 meters above sea level. The sculptures were discovered through the third National Survey on Cultural Heritage in Shanxi Province,[1] and their style and motifs are clearly based upon the Yungang Grottoes of the Northern Wei Dynasty, produced during the period when Pingcheng served as its capital city, which has significant meaning for academic research. For this reason, the authors investigated the sculptures twice, in November 2011 and July 2012, respectively, and discovered that the cliff where the sculptures are located is in the remains of an ancient temple. The temple was built alongside the mountain, generally facing south. A two-layer platform, built with stone slabs and more than 5 m high, still stands in the south of the temple, but no stairs are found. There are also stone walls around the temple. A huge slice of a boulder stands in an area slightly north of the temple’s center, and niched sculptures are carved on both the northern and southern faces of the boulder. This area is 1 m higher than the south part of the temple, and the remains of a platform, built with stone slabs, are found 3 m south of the stone. As a result, it is believed that this area is the site of the temple’s main hall and that the cliff sculptures were for worship inside the hall. Other areas are covered by trees and shrubs. The authors observed on-site that there are some pits newly dug by grave robbers in the area around the remains. The style of the debris in the pits, and of the carvings on stone fragments found there, indicates that they belong to the Ming and Qing dynasties. From this it is inferred that the temple was built during the Ming Dynasty.[2]
During this investigation, the authors visited some villagers in Zhangbi Village and learned that the heads of the Buddha and Bodhisattva from the lower niche to the west on the boulder were stolen, and their whereabouts are unknown. The authors acquired from the villagers two photographs of the cliff sculptures taken before their heads were stolen,[3] which show their original state. A discussion of the time of the carving, style and motifs of the Dafoshan cliff sculptures, and of the southward migration of the Yungang style indicated by the sculptures, follows.
PRESENT SITUATION OF THE SCULPTURES
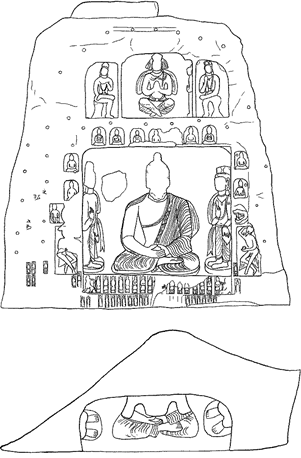
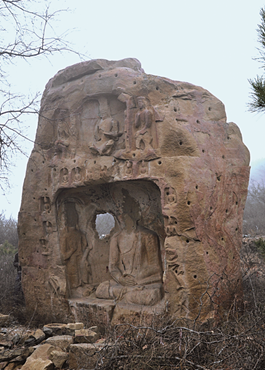
The southern portion of the huge boulder has a width of 4.5 m, the northern portion a width of 4.75 m, the eastern part a thickness of 1.2 m, the western part a thickness of 0.05 m, and its central area a thickness of 1.9 m at its thickest point; the boulder’s present-day aboveground height is 4.8 m. The boulder slants forward with an inclination of 7 degrees, and its cross section looks like a stone bell (Figure 1). The front (southern side) has niched sculptures carved in the Northern Wei Dynasty, and the back (northern side) has niched sculptures carved in the Ming Dynasty.
(A) Sculptures on the Front
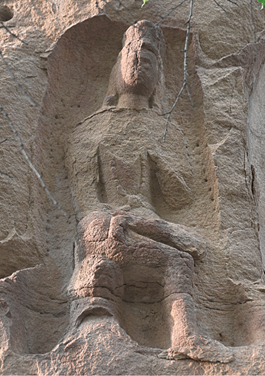
The layout of the front is well integrated. There is one large niche each in both the upper and lower sections (Figures 3 and 4).
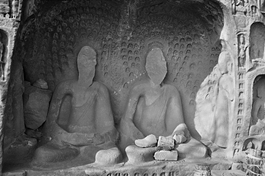
The niche in the lower section is 2 m high, 2.3 m wide and 0.85 m deep. There is one seated Buddha in the middle, flanked by Bodhisattva attendants, one each on the eastern and western walls.
The sculpture of the seated Buddha would originally have been 1.9 m tall, and the width between the shoulders is 0.93 m. The head has been stolen, and the height of the chiseled mark left behind is 0.52 m. The height from the shoulders to the bottom of the niche is 1.28 m. We can see from the old photograph that the Buddha has a high ushnisha, with hair that spirals and a bifurcated hairline. The Buddha bows his head, and his face is round, with wide cheeks and a plump chin. He has slender eyebrows and wide eyes chiseled into circular holes, and is staring downward. He has a high-bridged nose, and there is a smile on his lips (Figure 2). His strong neck, wide shoulders and slender waist indicate he is robust. He wears a samkaksika [inner robe] with two protruding edges, and a kasaya [outer robe] exposing the right shoulder, the hem of the kasaya shown outside the left arm; a pianshan-shoulder covering is draped over his right shoulder, hanging down along his right arm and disappearing under his right forearm. The drapery of the kasaya is fine and dense, the folds seeming thick and heavy, with zigzag designs on the wide edge, and a short hem. The Buddha’s shoulders slope downward slightly. His hands are placed over his belly with thumbs against each other, the backs of his hands facing forward, right hand covering the left, which is in the dhyana mudra gesture. The width between the knees is 1.33 m. He is crossing his left leg over the right, with his right foot exposed, sitting in lotus position on the bottom of the niche without a pedestal. There is a halo on the cliff behind his head, repainted by later generations. There is a small hole where the wall is very thin, between the sculpture of the Buddha and the Bodhisattva to his right, probably made by someone who was careless and broke the stone wall when carving the statues on the back (Figure 11).
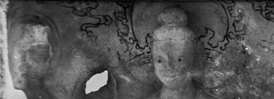
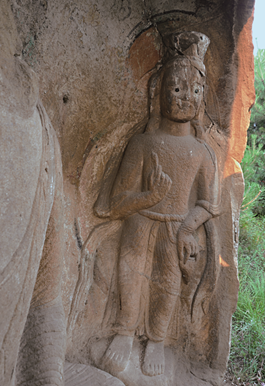
The Bodhisattva statue to the east is 1.58 m high. His head remains securely attached, and is disproportionately large. He wears a tall headdress decorated with round flat pieces of jade on the front and the two sides. There is a hoop underneath the headdress, and an outward-turning piece of silk fabric is tied to each of the two sides of the headdress and hangs down to the shoulder below. There is a crack along the right side of the headdress through the ushnisha to the left ear. His hair is in a bun, and the hair strands are carved clearly. His face is full and round, with arched eyebrows and wide eyes, into which black glazed beads were mounted by a later generation, in positions somewhat dislocated from the eyes’ original positions. There is a smile on his lips. His ears project outward and he wears earrings with tassels (Figure 5). His strong neck is engraved with a spade-shaped necklet and a necklace with circular jade ornaments that hangs down to his navel. He is bare to the waist, showing his wide rounded shoulders, which are engraved with two rings of armlets and three rings of bracelets. A navel is carved on his slender waist. A shawl stands up, wraps around his shoulders and drapes down along his elbows, and then terminates in double-tipped ends. His left hand hangs down in front of his left leg, holding a lock-shaped object, and his right hand holds a lotus bud out in front of his chest. The lower part of his body is relatively short. He is wearing a long skirt with a narrow belt around his waist. It looks like the skirt is made of one piece of cloth, tightly wrapped around the lower body from back to front, with the edges folded between the knees. The right hem is depicted using a zigzagging engraved pattern, and it goes around via the waist belt from the inside and then flips over at the left hip. The skirt is incised with fine and dense drapery that extends from the center of the belly to the thighs, then falls to the sides forming a sharp-angled shape at the lower hem. His feet are exposed below the skirt, with space between them. He stands on a plain round pedestal with a height of 0.09 m and diameter of 0.44 m. There is a halo on the back wall behind the Bodhisattva, repainted by later generations (Figure 6).
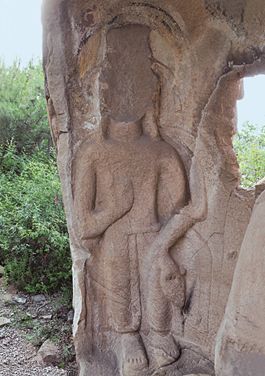
The Bodhisattva statue to the west was originally 1.68 m high, however, his head has been stolen, and the height of the chiseled mark is 0.45 m, and its width is 0.28 m. We can see from the old photographs that his facial features and the style of his headdress were similar to those of the Bodhisattva to the east. The outward-turning pieces of silk fabric from below the headdress and the earrings with tassels remain on the wall. The body has suffered slight erosion. His neck is strong, and a spade-shaped necklet and circular necklace with jade ornaments can be faintly seen. Two rings of armlets can be found around his left arm, but the right armlets and the bracelets around both wrists are very faint. The shawl, pose, hand gestures and skirt are all the same as those of the eastern Bodhisattva. His left hand hangs down in front of the left leg, holding a lock-shaped object, while his right hand holds a lotus bud in front of his chest, though the bud is too blurred to see in detail. There are feet under his skirt, standing on a plain round pedestal. The height of the pedestal is 0.06 m, and its diameter 0.3 m. There is also a halo on the back wall behind the Bodhisattva, repainted by later generations (Figure 7).
There are two small arched niches on each side outside the Buddha niche, one above the other, and each is 0.3 m in height and 0.22 m in width. Inside each niche there is a seated Buddha, legs crossed in lotus position with the dhyana mudra hand gesture. Their clothing has weathered away too badly to be seen clearly. The lower niche on the east holds an image of the ascetic Sakyamuni. He has a high ushnisha on his head, but his face has been damaged. Both earlobes hang down to his shoulders. Obvious veins are seen on his neck. Bare to the waist, he is emaciated with a slender waist, with an inverted V shape on his concave belly.
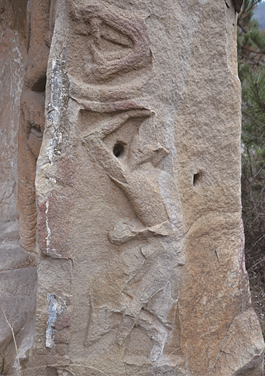
Below, there is a niche with an image of a Brahman to either side of the central Buddha niche. The eastern one has a height of 0.76 m, width of 0.38 m and depth of 0.09 m. The eastern edge of the niche is damaged. The Brahman carved in the niche is well preserved, with a height of 0.74 m. His head tilts eastward, and the part of his head above the eyes is damaged. He has a narrow nose and wide mouth, a goatee, and a thin neck. He is skinny, and his upper body bends forward. His right hand is raised to touch the top of his head, and his left hand is placed in front of his belly, holding a skull. The upper part of his body is bare, and he wears a short skirt that goes around the back of his lower body with a sharply angled hem, but only covers his private parts at the front. His legs are bare, and his left leg stretches out in front of him and his right leg bends back beneath him, so that his lower legs cross, and he stands on tiptoe. Above this niche, a dragon head is carved, but all that remains is the open mouth showing fangs (Figure 8).
The western niche has a height of 0.74 m, width of 0.34 m and depth of 0.1 m. The upper part of the Brahman image is damaged, but judging from its remains, it seems to have the same height as the eastern one. His long hair is tied into a bun, and his head is tilted toward the Buddha niche, with his upper body leaning forward. Only his legs are remaining, and they are bare. His left leg bends back beneath him and his right leg stretches out in front of him, so that his lower legs cross, and he stands on tiptoe. The hem of the skirt falls at a sharp angle to the side of his legs. On the top of this niche, a dragon head is carved, but it is damaged. There is a secular human figure carved in the niche to the west of the dragon head, with a big head and facial features that are unclear due to weathering, but we can see that he is squatting and holding his ankle with his right arm.
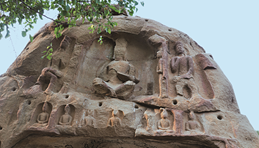
The niche in the upper section is 0.47 m above the lower one, and can be divided into three parts: a main niche and two auxiliary niches. Because a large part of the cliff outside the niches has eroded, the lintels of these niches are almost lost. There are some repair holes left in the niche, and two horizontal lines are incised between the holes. There is also an obtuse-angled corner left on top of the eastern Bodhisattva attendant in the main niche, and the tops of the two auxiliary niches are carved into half-arch structures. It can be inferred that there used to be a big arch-shaped lintel upon the upper niches, and that those two incised lines are meant to be the upper frame of the lintel. There are pilasters between the main niche and the two auxiliary niches to support the lintel (Figure 12).
The main niche has a height of 1 m, width of 1.1 m and depth of 0.3 m. There is a Maitreya Bodhisattva with ankles crossed carved in the middle, and one Bodhisattva attendant carved on each of the eastern and western walls. The Maitreya Bodhisattva has a height of 1 m. He is wearing a high headdress with triangular pieces of silk fabric on each side. His face is damaged, but his ears are intact, wearing earrings with tassels. His neck is short and he wears a necklet. There are two S-shaped ornaments hanging over his chest, with a shawl sticking up around his shoulders, hanging down outside his arms, and draping down over his elbows. Around his shoulders he wears a necklace with jade ornaments connected by pearls, which is hanging down to his belly, where it connects to a circular flower-shaped ornament, and from there turns toward his back. The upper part of his body is bare, and he wears a skirt with fine and dense drapery. His right forearm and two hands are all damaged, and from the remains it seems that he is cupping his hands in front of his chest. His feet are exposed under the skirt, and he is sitting with his ankles crossed, without a pedestal. The eastern Bodhisattva attendant’s height is 0.65 m. Also wearing a high headdress, he has a long round face, but the facial features are difficult to see. He wears a kasaya that covers his shoulders, and its lower edge is kept close to his lower body. He is slender, holding his palms together and standing perfectly straight. The western Bodhisattva attendant is damaged.
In each of the auxiliary niches, there is one Bodhisattva sitting with one leg pendent and the other crossed. The eastern auxiliary niche has a height of 0.87 m, width of 0.53 m and depth of 0.15 m. The height of the seated Bodhisattva is 0.87 m. His head tilts slightly to the west and he wears a high headdress. His face is round, with slender eyebrows, eyes sticking out slightly, a narrow nose and a small mouth. He wears earrings with tassels. A spade-shaped necklet is engraved around his short neck. Around his shoulders he wears a necklace with jade ornaments connected by pearls, which hangs down to his belly, where it connects to a circular flower-shaped ornament, then turns toward his back. His upper body is bare, and his lower body has suffered erosion from weathering, so it is hard to see the skirt. He places his left hand on his left foot, and places his right hand over his right shoulder. The legs are difficult to see due to the erosion. We can only see that his left leg is crossed over his right leg, his right leg is pendant, and he sits on a narrow-waisted pedestal (Figure 9).
The height and width of the western auxiliary niche are the same as the eastern one. The height of the seated Bodhisattva is also 0.87 m. His head tilts slightly to the east and he wears a high headdress. His face is round, with slender eyebrows, eyes sticking out slightly, a narrow nose and a small mouth. He wears earrings with tassels. He has a short neck. His chest suffers heavily from erosion, and the necklet is damaged. He wears an X-shaped necklace with jade ornaments around his shoulders just like the one on the eastern Bodhisattva. His upper body is bare, and he wears a skirt. He raises his left arm, but the hand is damaged, and he places his right hand over his left leg. His left leg is crossing over his right leg, his right leg hangs, and he sits on a narrow-waisted pedestal (Figure 10).
There are seven small arched niches carved in a row between the upper and lower niches, with a seated Buddha carved in each niche. Each of these Buddhas wears a kasaya that either covers both shoulders or, on every other Buddha, exposes the right shoulder. All of them are sitting cross-legged in lotus position, in meditation with the dhyana mudra hand gesture. The third one from the east is damaged.
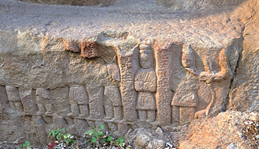
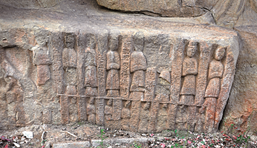
There are two rows of patrons carved under the lower niche. The height of the patrons on the upper row is 0.27 m. Taking the main Buddha as the axis of division, the males are standing on the eastern (left) side, and the females are standing on the western side; all of their names are inscribed. The rock between the male and female patrons has come off, but the remaining part close to the males has a visible honeysuckle pattern, indicating that this part should have been a boshanlu-incense burner. One lion is carved on each side outside the male and female patrons, but these have almost completely weathered away; the western one is squatting and faces toward the west with its head turned around. There are seven male patrons, and two of them are well preserved. Each of these two wears a hood, a robe with a crossed collar and tight sleeves and a pair of narrow trousers, and rests his hands within his sleeves in front of his chest (Figure 13). The other patrons have been severely damaged. The inscriptions, from west to east, are as follows: (1) “the time when […] paid homage to the Buddha”; (2) “the time paid homage to the Buddha”; (3) weathered away; (4) has come off; (5) “the time when […] […] […] Buddha”; (6) “the time when (Buddhist) Deacon Zhang Anxing paid homage to the Buddha”; (7) “the time when Zhang […], a member of the Buddhist community, paid homage to the Buddha.” There are eight female patrons, wearing crossed-collar robes with tight sleeves and skirts, resting their hands within their sleeves in front of chests (Figure 14). The inscriptions, from east to west, are as follows: (1) “the time when Buddhist Deacon Shentu Yun paid homage to the Buddha”; (2) “the time when Buddhist Deacon […] […] […] paid homage to the Buddha,” in which the name was intentionally ground away; (3) “the time when Buddhist Deacon […] […] […] paid homage to the Buddha,” in which the name was intentionally ground away; (4) “…Zu paid homage to the Buddha,” in which the name was (again) intentionally ground away; (5) “the time when Buddhist Deacon Lin Sinan paid homage to the Buddha”; (6) “the time when […] Zhou Yu paid homage to the Buddha”; (7) damaged; (8) “the time when […] […] […] Yusheng paid homage to the Buddha.”

The images of the lower patrons are smaller, having a height of 0.18 m. Like the upper patrons, the male patrons are on the east (left), and the females are on the west. There are more than eight male patrons, but they are badly damaged, and only the characters yizi [邑子, “member of the Buddhist community”] can be recognized among the inscriptions. There are 10 female patrons, and the inscriptions, from east to west, are as follows: (1) “Buddhist Deacon Yang […] […] paid homage to the Buddha”; (2) “[…] Buddhist Deacon Qi […] […] paid homage to the Buddha”; (3) “[…] Wang Fu-[…], a member of the Buddhist community, paid homage to the Buddha”; (4) “Zhou”; (5) “the time when Guo […] […] paid homage to the Buddha”; (6) “[…] He He (?)-kui paid homage to […]”; (7) “[…] Wang Nü-[…] paid homage to the Buddha”; (8) “the time when […] […] […] paid homage to the Buddha”; (9) weathered away and unrecognizable; (10) “[…] […] […] […] paid homage to the Buddha.”
There are two male patrons carved under the west side of the Brahman niche in the east, arranged vertically. The inscription of the upper one is “[…] […] Zhang […] […] […].” The inscription of the lower one is “Zhang Yi (?), a member of the Buddhist community, paid homage to the Buddha.”
There are five male patrons carved to the west of the Brahman niche in the west, three arranged in the first row and two in the second row, all wearing robes with tight sleeves and narrow trousers, resting their hands within their sleeves in front of their chests. The inscription of the middle one in the first row is “Zhang Wen, a member of the Buddhist community, paying homage to the Buddha.” The inscription of the western one [in the first row] is difficult to see. The inscription of the eastern patron in the second row is “Zhang Zhi, a member of the Buddhist community, paying homage to the Buddha.” The inscription of the western patron in the second row is “[…] […] […] Chen paying homage to the Buddha.” There are also four male patrons under the eastern side of this niche. The first one on the east is the tallest, with the inscription “Buddhist Deacon […] […].”
There are three columns of characters carved on the west of the cliff, which probably are prayer texts, but all are difficult to read due to serious erosion.
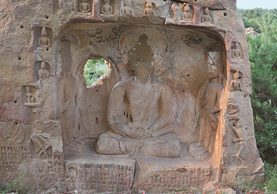
(B) Sculptures on the Back
On the back of the boulder, there is a series of sculptures in niches carved in the Ming Dynasty (Figure 15).
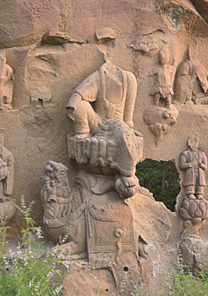
There is a sculpture of Avalokitesvara [Guanyin] riding a hou [a mythical creature with an appearance similar to that of a lion – Trans.] carved at 1 m above the ground, and the full height of the sculpture is 2 m. The height of the seated Avalokitesvara is 1 m, and his head has been stolen. He is wearing a garment with parallel collars draping down, and his right sleeve is rolled up. He is wearing a skirt with a hem. He places his right hand on his right knee, and leans on his left arm, palm against the lotus throne. He sits casually on the lotus throne on the back of the hou, with his right leg bent on the seat, and his left leg resting on a lotus-shaped support. The hou is 1.24 m in length. Its head is to the east, while its tail is to the west. It is facing upward, with round eyes and a wide nose, exposing its teeth, looking toward Avalokitesvara. A mane is carved around its neck, and there is an ornate seat on its back, with wide belts in front to tie around its neck. Its buttock area is damaged, and it crouches with its limbs bent (Figure 16).
There is one standing figure in secular dress carved on either side of the hou. The eastern one is the Dragon Girl. Her height is 0.62 m, and her head has been stolen. She wears a robe with wide sleeves, holding an offering tray with both hands in front of her chest. Her legs are bare under the robe, and she wears shoes. She stands on a lotus throne that is 0.4 m high. The western sculpture is Sudhana [Child of Wealth]. His height is 0.62 m high, and his head has also been stolen. He wears a sleeveless parallel-collared garment and trousers, and cups his hands in front of his chest. His hands are damaged, but he seems to be putting his palms together to pay obeisance. His feet are exposed under his trousers, he is also standing on a lotus throne that is 0.4 m high.
There is one deva on each side of Avalokitesvara. The eastern one has been stolen, with only traces of his feet and the cloud throne under the feet remaining. The western one is 0.6 m high. There is a cloud above his head. The head and upper body are damaged. His upper body appears bare, and he wears a short skirt. He raises his left hand while lowering his right hand, as if he is putting forth his strength. We can see his feet under the skirt, and he is standing on a cloud throne. The throne is 0.37 m high.
There is a niche to the side of each deva as well as one above Avalokitesvara. The top of the niche above Avalokitesvara is damaged, with a remaining height of 0.75 m and a width of 0.9 m. There is a sculpture of a seated Buddha with the head damaged in the niche, with a height of 0.75 m. Two holes remain, which seems to be repair marks. He wears a kasaya with parallel collars draping over the front of his body, places his hands over his belly, forming the dhyana mudra gesture, and sits cross-legged in lotus position on a lotus throne. The petals on the lotus throne are unfinished, having only been carved in outline.

The niche to the east of the eastern deva is 0.8 m high and 0.85 m wide. There are sculptures of an Arhat and a secular human figure carved in the niche. The height of the Arhat is 0.65 m. His head has been stolen. He wears a robe with a crossed collar, places his hands in sleeves on his legs, with the lower part of his legs exposed under his robe, and sits cross-legged in lotus position. The sculpture to the west of the Arhat is a standing secular human figure with a height of 0.54 m. His head has been stolen, and his left arm is damaged. He wears a robe with wide sleeves and places his hands over his chest and seems to be holding a huban-ritual baton.
The niche to the west of the western deva is 0.9 m high and 0.75 m wide. There is a Maitreya Buddha depicted as Budai form carved in the niche, with a height of 0.65 m. His head has been stolen, and he wears a kasaya, exposing his chest and potbelly; the navel can be seen. He places his left hand on his left leg, facing his palm upward; his right arm is damaged. He is sitting with his left leg crossed and raises his right leg up.
DISCUSSION
Because the cliff sculptures in the back were carved in the Ming Dynasty, which is not meaningful for our present study, there is no need to go into detail on those. As a result, we will discuss only the sculptures carved on the front.
(A) Style and Date
Although the prayer texts carved on the front cliff to the west of the niches are too faint to read and there are no historical documents or local gazetteers to consult, the sculptures have distinctive characteristics that can be dated stylistically.
Firstly, in terms of style, we may observe that the faces of both the Buddhas and Bodhisattvas are full and round, and that their bodies are robust. Each Buddha has broad shoulders and a narrow waist. The kasaya exposing the proper right shoulder shows dense drapery with heavy folds, features which are all clearly adopted from the early stage of the second phase of the Yungang Grottoes. For example, the Buddha and Bodhisattva sculptures of Caves 7 and 8 and Caves 9 and 10 of the Yungang Grottoes are similar. In particular, the Buddha is sitting directly on the bottom of the niche without any pedestal, which is the same style as the early stage of the second phase of the Yungang Grottoes. For example, most of the Buddhist sculptures of Caves 7 and 8 are seated without a pedestal, but those of Caves 9 and 10, which are dated a little bit later, mostly sit on sumeru pedestals. Additionally, the tall headdress on the Bodhisattva, the round flat pieces of jade on the front and two sides of the headdress, the earrings with tassels, the shawl standing up around the shoulders, and the circular or X-shaped necklace with jade ornaments, are all in the same style seen in the Yungang Grottoes in the early stage of the second phase. It is worth noting that the two S-shaped ornaments hanging over the chest of the Maitreya Bodhisattva with ankles crossed are prevalent in works from the first phase and the early stage of the second phase of the Yungang Grottoes, such as the Maitreya Bodhisattva as the principal image of Cave 17, the Maitreya Bodhisattva of Caves 7 and 8, and the Maitreya Bodhisattva of Caves 9 and 10. It is rare to see these kind of ornaments on Bodhisattva attendants in the Yungang Grottoes. As a result, the characteristics of the Buddhist sculptures on Dafoshan Cliff are the same as those of the Yungang Grottoes from the early stage of the second phase, and the dates are thus thought to be very close.
Secondly, in terms of the subject matter of the Buddhist sculptures, they are grouped in a combination of upper and lower niches. The lower niche is arched, with an image of Sakyamuni Buddha; the upper niche has an arched lintel, and is carved with the Maitreya Bodhisattva and two pensive Bodhisattvas. The combination of Sakyamuni Buddha and Maitreya Bodhisattva, and the use of pensive Bodhisattvas as attendants for Maitreya Bodhisattva, are prevalent aspects of the subject matter of the sculptures of Caves 7 and 8, and Caves 9 and 10 of the Yungang Grottoes. Although the lintel of the Dafoshan niche is weathered, the niche with Maitreya Bodhisattva is a form often seen in the Yungang Grottoes in the early stage of the second phase, representing Tusita Heaven where Maitreya Bodhisattva resides. Moreover, the two Brahmans flanking the lower niche are particularly notable. One of them is holding a skull. This kind of subject matter can be seen in Cave 9 and Cave 12 of the Yungang Grottoes, but is never seen in the Northern Wei caves in the Longmen Grottoes or Gongxian Grottoes. Thus, the subject matter of the Dafoshan cliff sculptures is the same as that seen in the early stage of the second phase of the Yungang Grottoes, another indication that these two sets of sculptures were carved in the same period.
In addition, in terms of the costumes of the patrons, each male patron wears a hood, a robe with a crossed collar and tight sleeves, and a pair of narrow trousers, which are typical Xianbei-style clothes. Emperor Xiaowen of the Northern Wei Dynasty started the reform of clothing in the tenth year of the Taihe reign period (486 CE), and Xianbei-style clothes were fully abandoned in the eighteenth year of the Taihe reign period (494 CE).[4] This reform led to a huge change in the sculptural style of the Yungang Grottoes – seen in Caves 5 and 6, and Caves 1 and 2 – carved in the later stage of the second phase, in which the Buddhist sculptures wear Han Chinese kasaya in the style of baoyi bodai – a loose robe and a wide girdle. Thus, the Xianbei-style clothing of the patrons indicates that they were carved before the reform, that is to say, probably close to the tenth year of the Taihe reign period (486 CE) or even earlier.
Caves 7 and 8, Caves 9 and 10, and Caves 11, 12 and 13 of the Yungang Grottoes all belong to the early stage of the second phase. Based on the descriptions in The Stele of the Reconstruction of the Great Cave Temples on Wuzhoushan Mountain in the Western Capital of the Great Jin [Dajin Xijing Wuzhoushan chongxiu da shikusi bei 大金西京武州山重修大石窟寺碑] of Huguo Temple and Chongjiao Temple, written by Cao Yan in the seventh year of the Huangtong reign period of the Jin Dynasty (1147 CE), Mr. Bai Su argues that the order in which the caves were carved during the early stage of the second phase is as follows: Caves 7 and 8 were the earliest, carved in the beginning of the reign period of Emperor Xiaowen, followed by Caves 9 and 10, which were carved by Qian’er Qingshi “from the eighth year (484 CE) to the thirteenth year (489 CE) of the Taihe reign period,” while Caves 11, 12 and 13 were carved in roughly the same period.[5]
In sum, it has been shown that the period of the Dafoshan cliff sculptures is close to that of the sculptures of Caves 7 and 8 and Caves 9 and 10 of the Yungang Grottoes, that is, the early years of the Taihe reign period of Emperor Xiaowen in the Northern Wei Dynasty (477-489 CE).
(B) Composition and Motifs
The cliff sculptures were designed and carved in a well-integrated layout. There is a seated Sakyamuni Buddha statue in the lower arched niche, while a Maitreya Bodhisattva with ankles crossed and two pensive Bodhisattvas are carved in the upper niche with an arched lintel. Between the upper and lower niches there are seven small Buddha niches. There are four small Buddha niches in the upper part next to the lower niche, and one niche for the statue of a Brahman on each side of the lower part of the lower niche. There are rows of patrons worshiping the Buddha carved under the lower niche.
As was mentioned before, there is an intrinsic relationship between the upper and lower niches, forming a unified theme, that is, the combination of Sakyamuni Buddha and Maitreya Bodhisattva. This is the same as the principal niched sculptures on the main walls of the Yungang Grottoes in the second phase; for instance, the combination of upper and lower niches is also seen on the main wall of the main chamber of Caves 7 and 8 of the Yungang Grottoes. In the upper niche of Cave 8, there is one seated Buddha with legs pendant, two Maitreya Bodhisattvas with ankles crossed and two pensive Bodhisattvas, and a seated Sakyamuni Buddha in the lower niche. In the upper niche of Cave 7, there is a Maitreya Bodhisattva with ankles crossed flanked by two seated Buddhas with legs pendant in front, and two pensive Bodhisattvas on the side walls, and there is a Sakyamuni Buddha and Prabhūtaratna Buddha in the lower niche. The image of the Maitreya Bodhisattva represents a scene where he is expounding on Buddhist doctrine in Tusita Heaven, which is mentioned in the Sutra on the Visualization of Maitreya Bodhisattva’s Rebirth in Tusita Heaven [Guan Mile Pusa shang sheng Doushuaitian jing 观弥勒菩萨上生兜率天经], translated by Juqu Jingsheng in the Liu Song Dynasty.[6] It is a prevalent subject during the Northern Liang Kingdom of the Sixteen Kingdoms period and the Northern Wei Dynasty. The two pensive Bodhisattvas images should represent Sakyamuni Buddha in meditation for enlightenment when he was the Crown Prince, that is, the image of the contemplative prince. It often appears as the attendant to Maitreya Bodhisattvas in the Yungang Grottoes. For instance, in Cave 10 of the Yungang Grottoes there are two pensive Bodhisattvas (the western one has been changed to a standing Bodhisattva) flanking the principal image, a Maitreya Bodhisattva with ankles crossed (which has been damaged; only an outline is left) on the main wall of the main chamber. It is documented in the “Treatise of Buddhism and Daoism” [Shi lao zhi 释老志] from the Book of Wei that: “The Buddha, whose original name was Sakyamuni, was imbued with talent and benevolence, embodying moral practices, and benefiting all existence. There had been six Buddhas before Sakyamuni Buddha, and he followed the six Buddhas to attain Buddhahood in the present period of Bhadrakalpa. It is also said that Maitreya Buddha will come into the world after Sakyamuni Buddha.”[7] It is obvious that the main focus of worship is supposed to be Sakyamuni Buddha, who exists in the present, and Maitreya Bodhisattva, who will appear in the future. The seven small niches show the seven Buddhas of the past, accompanying the principal images to from a comprehensive representation of the Buddhas of the past, present and future.
Among the four small Buddha niches in the upper part next to the lower niche, the small lower niche in the east shows the ascetic Sakyamuni. It is difficult to interpret the composition of these four niched Buddhas, but they are similar to the four seated Buddhas carved above the pilaster of the southern wall of the front chamber in Cave 12 of the Yungang Grottoes, where the second one from the east is the ascetic Sakyamuni.[8] It is documented from Buddhist scriptures on the Buddha’s biographical stories that Sakyamuni left home to pursue ascetic practice in the mountains for six years and became emaciated, and came to understand that undergoing such suffering was not the right way to attain enlightenment. So he gave it up, bathed in the river Nairanjanā, accepted a meal of milk-rice gruel from a cowherd maiden to restore his energy, and came to sit under the Bodhi tree to achieve enlightenment.[9] So the statue of the ascetic Sakyamuni seems to admonish followers that ascetic practice is not the right way to a full enlightenment, but will only destroy the body.
There is one niched Brahman in the lower part on each side of the lower niche. The eastern one is holding a skull; the western one is holding something that it is hard to identify due to damage. Brahmans in pairs can first be seen from the second phase of the Yungang Grottoes. For example, there is a pair of Brahmans carved on the prominent positions flanking the window in Cave 9 of the Yungang Grottoes. The western one is holding a skull in his right hand, pointing forward with his left index finger, while the eastern one is holding a bird in his left hand, touching his forehead with his right hand.[10] There is also a pair of Brahmans carved on both sides of the seated Buddha in the south niche on the upper western wall of the front chamber in Cave 12 of the Yungang Grottoes; the one to the right of the Buddha is holding a skull in his right hand, touching his left ear with his left hand, while the one to the left is holding a bird in his left hand, pointing forward with his right hand.[11] There is a pair of small Brahmans on both sides of the niche that holds the Sakyamuni Buddha and the Prabhūtaratna Buddha, carved on the front wall during the second phase in Cave 19 of the Yungang Grottoes; the one to the left of the niche is holding a skull in his right hand, sitting in half lotus position, while the right one is holding a bird in his left hand and standing.[12] All the Brahman sculptures mentioned above are similar to the Dafoshan cliff sculptures: They are wearing tall hair buns, have full beards, are skinny, have bare upper bodies, and wear short trousers. However, most of the Brahmans of the Yungang Grottoes are sitting in half lotus position on the shubozuo [束帛座], a cylindrical pedestal carved as if it were covered by fabric that is tied up at the bottom. This motif is never seen in the Longmen or Gongxian Grottoes, but is popular in the Mogao Grottoes at the Dunhuang site. For example, in the east-facing main niche on the central column of Cave 254 of the Northern Wei Dynasty, there is an image of Vasistha [Posou xian 婆薮仙] painted to the south of the Buddha with ankles crossed, while the Indian ascetic Mrgashirsa [Lutou fanzhi 鹿头梵志] is painted to the north.[13] These two Brahmans are both shown from the side, with one leg placed in front of the other, standing on tiptoe. The postures are almost the same as those of the Dafoshan cliff sculptures. Accordingly, we can infer that the damaged western Brahman in the Dafoshan cliff sculptures should be holding a bird.
Mr. Seiichi Mizuno and Mr. Toshio Nagahiro argue that the figure holding a skull from Cave 9 of the Yungang Grottoes is supposed to be the Brahman who sells skulls in the karmic story mentioned in the sixth fascicle of the History of the Transmission of the Treasury of the Dharma,[14] but they do not suggest an interpretation of the figure holding a bird.[15]
It is generally accepted in academia that the one holding a skull is Mrgashirsa, while the one holding a bird is Vasistha.[16] Mrgashirsa is mentioned in the Śrāvaka-nipāta [Shengwen pin 声闻品], the twentieth fascicle of Ekottarāgamasūtra [Zengyi ahan jing 增壹阿含经], translated into Chinese by Samghadeva during the Eastern Jin Dynasty. It is said that Mrgashirsa “mastered astronomy and medical science, curing patients and also understanding the reason for death.” Sakyamuni Buddha gave skulls of the dead to Mrgashirsa, and asked him to identify the sex, the cause of death and the transmigration. Mrgashirsa examined each skull by knocking it repeatedly and could provide all the requested information. Only in the case of the skull of Arhat Udayana could he not tell the transmigration, and Sakyamuni Buddha told him of the profundity in Buddhist Dharma that can end the transmigration of living and death. At that time “Mrgashirsa immediately converted to become a Buddhist monk to learn the Dharma, falling into meditation in a quiet place…and then became an arhat.”[17] “Vasistha” is also translated into Chinese as Posou [婆蓃] or Posou fusi [婆薮缚斯]. It is documented in the third fascicle “Introductory Section, Middle Part: Treatise on Living in Rājagrha” [Chu pin zhong: Zhu Wangshecheng shilun 初品中・住王舍城释论] from the Great Treatise on the Perfection of Wisdom [Da zhidu lun 大智度论], translated by Kumārajīva, that Vasistha was the King of Magádha and became a Brahman sage, arguing that Brahman could kill living things as sacrifices. Later, he was expelled to hell, and then, under the instruction of the Buddha, became a Buddhist.[18] But Mr. Huimin Wang thinks differently, insisting that there is no documentation of the person holding the bird in Buddhist scripture, and that this person should be Nirgrantha.[19] The Buddhist scriptures quoted by Mr. Wang are the Abhidharma-kośa-śāstra [Jushe lun 俱舍论], translated by Xuanzang in the Tang Dynasty, and the Commentaries on Abhidharma-kośa-śāstra [Jushe lun ji 俱舍论记], written by Puguang, who was a disciple of Xuanzang. This is less than abundant evidence, and cannot be treated as conclusive. But, no matter which explanation is correct, these two Brahmans are carved for the purpose of telling a karmic story of nonbelievers converting to Buddhism.
In sum, the composition of the Dafoshan cliff sculptures is aimed at preaching Dharma and the order of Buddhism. They include all of the Buddhas that have benefitted society from past to future, which are extremely powerful in helping nonbelievers to convert to Buddhism. It also shows that there is no need to undertake ascetic practices to practice Buddhism.
(C) The “Yungang Style” and the Southward Migration of the Yungang Craftsmen
The family name of the male patrons of the Dafoshan cliff sculptures is Zhang, and there are two different types, which are weina (a Buddhist Deacon) and yizi (a member of the Buddhist community); there are no official titles. The family names of the female patrons are Guo, Wang and so on, also with the two different types, weina and yizi. The symmetrical arrangement of the sexes indicates that the female patrons were the wives and daughters in the Zhang family. As a result, these patrons would have belonged to the local Buddhist community which consisted of members of the Zhang family, and they commissioned this huge cliff sculpture.
The Dafoshan cliff sculptures are quite similar in style and motifs to those of the second phase of the Yungang Grottoes. This is the first time this kind of sculpture has been found in the Gaoping area. There can be no doubt, then, that the style and motifs of the Buddhist sculptures are adopted from the Yungang Grottoes. More importantly, knowing this inspires research about the identity and migration of the craftsmen involved.
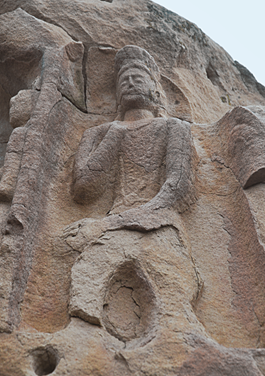
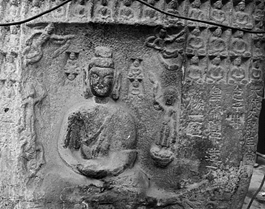
There are some sculptures carved during the late period of the Taihe reign period of Emperor Xiaowen of the Northern Wei Dynasty that have been discovered in the Gaoping area, such as the large niche of Sakyamuni Buddha and Prabhūtaratna from the Yangtoushan Grottoes[20] and the four-sided stone stele of “The stone sculpture established for the Emperor by members of the Buddhist community” [Yizi deng wei Huangdi bixia zao shixiang 邑子等为皇帝陛下造石像] in the twentieth year of the Taihe reign period in the Northern Wei Dynasty (496 CE) found in Jianning County, Gaoping City. Although these sculptures maintain the characteristics of the earlier style seen in the first and second phases from the Yungang Grottoes, all of them differ in obvious ways from the Dafoshan sculptures; for instance, there are no folds carved on the kasaya that exposes the right shoulder, and there is no zigzag design on the edge of the kasaya (Figure 17). The bodies of the Buddha and Bodhisattva figures are full and round, though not as round as those of the Dafoshan sculptures, and their faces are more slender (Figure 18). Their carving techniques are inferior and clumsy, and these differences show that they were carved by different craftsmen. The Dafoshan sculptures were carved by craftsmen familiar with the style and motifs of the Buddhist sculptures of the Yungang Grottoes, but the others were carved by local craftsmen. This indicates that the craftsmen of the Dafoshan cliff sculptures probably came from Pingcheng, and had probably taken part in the carving of the Yungang Grottoes.
Work on the Yungang Grottoes began in the first year of the Heping reign period of Emperor Wencheng of the Northern Wei Dynasty (460 CE). At this time, large amounts of capital, many laborers, numerous talented individuals and great financial resources were gathered in Pingcheng, the capital city of the Northern Wei Dynasty (present-day Datong City, Shanxi Province). They were carved under the leadership of Tanyao, who was the chief administrator of Buddhist monks. The Yungang Grottoes are the product of the confluence of cultures from the west and the east, producing what has been called the “Yungang style” in academia.[21] Such a large-scale project of sculpture carving as was undertaken at the Yungang Grottoes must have been administered using strict organization and carried out by groups of craftsmen. Over the more than 20 years’ carving work, many outstanding craftsmen would have been cultivated with the accumulation of an abundance of Buddhist pictorial materials. It is commonly believed that after Emperor Xiaowen moved the capital to Luoyang in the eighteenth year of the Taihe reign period in the Northern Wei Dynasty (494 CE), the imperial project of carving the Yungang Grottoes was stopped, while carving of the Longmen Grottoes in Luoyang began. It is inferred from this that many craftsmen were moved with the capital to Luoyang. But, as is seen in the case of the Dafoshan cliff sculptures, this kind of migration had already occurred before the capital was moved. Although this earlier southward migration of craftsmen is an isolated case, it played an important role in the carving of sculptures in the local area.
Gaoping City is located in the southeastern area of Shanxi Province. Its northern neighbor is Changzhi City; its southern neighbor is Jincheng City; and it is in the middle of the Shangdang Basin. During the Northern Dynasties, Gaoping City was one of the central cities in this area, and was along the key route between Pingcheng and Luoyang. It is documented in the “Treatise on Administrative Geography: Part I” [Dixing zhi shang 地形志上] from the Book of Wei that: “Regarding Jianzhou Region, Murong Yong [the ruler of Western Yan during the Sixteen Kingdoms period] divided it from the Shangdang Commandery and established the Jianxing Commandery. It was abolished in the ninth year of the Zhenjun reign period, but set up again in the fifth year of the Heping reign period [of the Northern Wei Dynasty]. During the Yong’an reign period, the Commandery was changed into a Region, and Gaodu City was made its seat of command. Under its administration there were four commanderies and 10 districts, with 18,940 families and 75,300 residents.”[22] The four commanderies under the control of Jianzhou Region were Gaodu (present-day Jincheng City), Changping (present-day Gaoping City), Anping (covering present-day Qinshui and Yangcheng Counties) and Taining (covering western parts of present-day Qinshui and Yangcheng Counties). Though it did not cover a wide area, it had a large number of residents. Gaodu City (present-day Gaodu Town north of Jincheng City) was located between Jincheng and Gaoping. Gaoping District (whose seat was Gaoping City) and Xuanshi District (whose seat was Xuanshi City), which belonged to Changping Commandery, were located in the eastern area of present-day Gaoping City. These three cities were all on the ancient traffic route. The Dafoshan cliff sculptures are the earliest ones carved in the Jianzhou area, bringing the practice of sculpture carving to this region. The grottoes of the Northern Dynasties are mainly distributed inside the border of present-day Gaoping City. The most important ones include the Yangtoushan Grottoes, Shitanghui Grottoes[23] and Qifoshan Grottoes, carved in the Northern Wei Dynasty, and the Gaomiaoshan Grottoes,[24] carved in the Eastern Wei Dynasty. In conclusion, a proper understanding of the southward migration of the Yungang craftsmen and the effect on the sculptures in the local area requires special attention to research findings on the developments in sculpture carving of the Northern Wei Dynasty.
References Cited
1. Shanxi Provincial Bureau of Cultural Heritage. 2010. Houzhong Shanxi – Shanxisheng disanci quanguo wenwu pucha zhongyao xin faxian xuanbian 厚重山西——山西省第三次全国文物普查重要新发现选编 (Shanxi, a Province of Rich History and Heritage: Anthology of Important New Discoveries from the Third National Survey of Cultural Heritage in Shanxi Province), pp. 202-203. Science Press.
2. Long, Rulin (Qing Dynasty). “Dili tiao” 地理条 (Geography Entries). In Tongzhi – Gaoping xian zhi 同治·高平县志 (Gazetteer of Gaoping in the Tongzhi Reign Period), Vol. 1, p. 6. Dafoshan is marked to the north of Zhangbi Village in the Illustration of the Northeastern Seven Miles, but no details about Dafoshan Temple are mentioned. The name of Dafoshan was probably given for the giant Buddha statue in the mountain.
3. The exact time the heads were stolen is impossible to determine. However, the second time the authors conducted interviews in Zhangbi Village, in July 2012, they acquired from the villagers two photographs of the cliff sculptures taken before the heads were stolen.
4. Wei, Shuo (Northern Qi Dynasty). 1974 (reprint). “Gaozu ji” 高祖纪 (Annals of Emperor Gaozu). In Weishu 魏书 (Book of Wei), Vol. 7. p. 161. Zhonghua Book Company. It reads: “On the guihai day, which was the fifteenth day of the first moon in spring of the tenth year [of the Taihe reign period] (486 CE), Emperor [Xiaowen of the Northern Wei Dynasty] started to wear formal royal dress and headwear in Han Chinese style…. On the xinyou day, which was the fifteenth day of the fourth moon in the summer, the official garments in five ranks were introduced.”
Sima, Guang (Song Dynasty). 1956 (reprint). “Qi ji wu” 齐纪五 (The History of Qi: Part V). In Zizhi tongjian 资治通鉴 (Comprehensive Mirror to Aid in Government), Vol. 139, p. 4370. Zhonghua Book Company. It reads: “Emperor [Xiaowen] of the Northern Wei Dynasty wanted to change the style of clothing. On the renyin day (in the eleventh moon) [of the first year of the Jianwu reign period, which was also known as the eighteenth year of the Taihe reign period, 494 CE], his edict forbade people from wearing Hu-style clothes, and most of the people were dissatisfied.”
5. Su, Bai. 1978. “Yungang shiku fenqi yanjiu” 云冈石窟分期研究 (Study of the Periodization of the Yungang Grottoes). Kaogu xuebao 考古学报 (ACTA Archaeologica Sinica) No. 1. The project of carving the sculptures of Cave 11 was stopped once, and on the upper part of the eastern wall inside the cave new sculptures were carved in the seventh year of the Taihe reign period (483 CE); therefore, Cave 11 is thought to have been carved before 483 CE.
6. Takakusu, Junjiro et al. 1924-1932. Taishō shinshū Daizōkyō 大正新脩大蔵経 (Newly edited great Buddhist canon, compiled in the Taisho era), T14, p. 419. Taishō Complete Buddhist Scriptures Publication Society, Tokyo.
7. Wei, Shuo (Northern Qi Dynasty). 1974 (reprint). Weishu 魏书 (Book of Wei), p. 3027. Zhonghua Book Company.
8. Mizuno, Seiichi et al. 1953. Unkō sekkutsu 雲崗石窟 (Yungang Grottoes), Vols. VIII-IX, Cave 12, Plate 5. Institute for Research in the Humanities, Kyoto University.
9. The story of Sakyamuni’s ascetic practice is mentioned in:
Zhu, Dali et al. (Late Han Dynasty) (translator). “Chujia pin” 出家品 (Section on Quitting the Household Life for Monastic Life), Fascicle 5. In Xiuxing benqi jing 修行本起经 (Cārya-nidāna). In [6], T3, p. 469.
Dharmarakṣa (Western Jin Dynasty) (translator). “Liunian qin kuxing pin” 六年勤苦行品 (Section on Six Years of Ascetic Practices), Fascicle 5. In Pu yao jing 普曜经 (Lalitavistara Sutra). In [6], T3, p. 511.
Guṇabhadra (Liu Song Dynasty of the Southern Dynasties) (translator). Guoqu xianzai yinguo jing 过去现在因果经 (Sutra on the Karmic Consequences of Past and Present), Fascicle 3. In [6], T3, p. 639. Here it is documented that: “At that time the Crown Prince [Sakyamuni] thought, I started from eating one grain each of rice and linseed every day, and gradually I ate one grain each of rice and linseed every seven days. I am as emaciated as dead wood, and I have insisted on this ascetic practice for six years, but I have not been successful, so I have come to know that it is not the right way to enlightenment.”
10. Repository of Cultural Relics in the Yungang Grottoes. 1994. “Yungang shiku er” 云冈石窟二 (Yungang Grottoes II). In Zhongguo shiku 中国石窟 (Chinese Grottoes), Plates 6 and 7. Cultural Relics Press, Beijing.
11. See [8], Plates 3 and 5.
12. Mizuno, Seiichi et al. 1951. Unkō sekkutsu 雲崗石窟 (Yungang Grottoes), Vol. XIII. Plates 71A and 74. Institute for Research in the Humanities, Kyoto University.
13. Institute of Dunhuang Relics. 1981. “Dunhuang Mogaoku yi” 敦煌莫高窟一 (Mogao Grottoes of Dunhuang, Part I). In Zhongguo shiku 中国石窟 (Chinese Grottoes), Plates 27 and 28. Cultural Relics Press, Beijing. According to the captions, the two Brahmans are Mrgashirsa and Vasistha.
14. See [6], T50, p. 322. It is recorded in Fascicle 6 of the History of the Transmission of the Treasury of the Dharma [Fu fazang yinyuan zhuan 付法藏因缘传], translated by Tanyao, that: “Once there was a Brahman who peddled a large number of human skulls in Pāṭaliputra city. After a long time, no one had bought any, so he was angry and spoke loudly, ‘If there is no one coming to me to buy skulls, I will spread around bad words about you, as all of you are stupid.’ At that time, an upāsaka [a lay devotee of Buddhism] in the city heard of this and was worried about being defamed, so he went up with some money to buy the skulls. He inserted a copper wire into the ear of the skull. If the wire went through all the way, he bought it for a high price. If the wire went halfway, he paid less. If the wire could not go through at all, he would not pay for it. The Brahman asked the upāsaka, ‘These skulls do not differ from one another, so why do you pay differently?’ The upāsaka answered, ‘If the wire can go through, [this indicates] that the person listened to and accepted Buddhist preaching, and that he had good wisdom, so I pay more. If the wire only goes halfway, [this indicates that, although] that person listened to Buddhist preaching, he was not able to understand it well, so for this reason I pay you less. If the wire does not go through at all, that person never listened to Buddhist preaching, so I would not pay for it.’ The upāsaka went out of the city with the skulls and established a stupa to worship them. When he died, he was allowed to be reborn in Heaven…. Even this upāsaka was able to be reborn in Heaven by building a stupa for the skulls who listened to Buddhist preaching, not to mention those who devote themselves to Buddhism by listening to preaching and worshiping the scriptures.”
15. See [12], Vol. VI, p. 17.
16. Xie, Shengbao. 2003. “Shilun Dunhuang shiku bihua zhong de Posou xianren he Lutou fanzhi” 试论敦煌石窟壁画中的婆薮仙人和鹿头梵志 (Discussion on Vasistha and Mrgashirsa in the Dunhuang Frescoes). In 2000 nian Dunhuang guoji xueshu taolunhui lunwen ji 2000年敦煌国际学术讨论会论文集 (Proceedings of the 2000 Dunhuang International Academic Conference). Gansu Minzu Press.
17. See [6], T2, pp. 650-652.
18. See [6], T25, pp. 75-76.
19. Wang, Huimin. 2010. “Zhique waidao fei Posou xian” 执雀外道非婆薮仙 (The Person Holding a Bird is Not Vasistha). Dunhuang yanjiu 敦煌研究 (Dunhuang Studies) No. 1.
20. Zhang, Qingjie et al. 2000. “Shanxi Gaoping Yangtoushan shiku diaocha baogao” 山西高平羊头山石窟调查报告 (Research Report on the Yangtoushan Grottoes in Gaoping City, Shanxi Province). Kaogu xuebao 考古学报 (ACTA Archaeologica Sinica), Plates 8:1 and 20:4. The niche shown in Plate 20:4 holds Sakyamuni Buddha and Prabhūtaratna Buddha side by side. It was the earliest niche in the Yangtoushan Grottoes, and the heads were stolen in the late 1990s.
21. Su, Bai. 1994. “Pingcheng shili de jiju he ‘Yungang moshi’ de xingcheng yu fazhan” 平城实力的集聚和“云冈模式”的形成与发展 (The Strength Accumulation of Pingcheng and the Formation and Development of the “Yungang Style”). In “Yungang shiku er” 云冈石窟二 (Yungang Grottoes II) of Zhongguo shiku 中国石窟 (Chinese Grottoes). Cultural Relics Press, Beijing.
See also: Su, Bai. 1996. Zhongguo shikusi yanjiu 中国石窟寺研究 (Studies on Chinese Grottoes), pp. 114-144.
22. See [7], Vol. 106, pp. 2481-2482.
23. Li, Yuqun and Lidu Yi. 2009. “Shanxi Gaoping Shitanghui shiku” 山西高平石堂会石窟(Shitanghui Grottoes in Gaoping City, Shanxi Province). Wenwu 文物 (Cultural Relics) No. 5.
24. Li, Yuqun. 1999. “Shanxi Gaoping Gaomiaoshan shiku de diaocha yu yanjiu” 山西高平高庙山石窟的调查与研究 (Investigation and Research on the Gaomiaoshan Grottoes in Gaoping City, Shanxi Province). Kaogu 考古 (Archaeology) No. 1.
Wenwu (Cultural Relics) Editor: Jie Liu
Translated by Xu Zhang, Ph.D., The Center of Archaeological Sciences and Experiments, Institute of Archaeology, Chinese Academy of Social Sciences, Beijing, China
This article was originally published in Wenwu (Cultural Relics) No. 3, 2015, pp. 81-93.